
 and Server (SPS)")
 3.0 / Microsoft Office SharePoint Server (MOSS) 2007")
Walkthrough: Windows Uploader
 Print Article
 End user experience of launching the Windows Uploader
After UploadZen has been installed, fully deployed and an Upload Action (with its Client-side uploader option set to the legacy Windows Uploader mode) has been made available, navigate to any Form Library, Picture Library, Slide Library, Translation Management Library, Web Part Gallery, Master Page Gallery, List / Site Template Gallery or any other SharePoint Document Library and drop down the Upload menu. In addition to the SharePoint Upload Document menu item, you should also see your Upload Action's menu item:
In SharePoint 2013 & 2010, the above also applies to the "New" ribbon group in the Library Tools / Documents ribbon tabs.
Now click the Upload Action's button or menu item to launch the Windows Uploader window. The first time the Windows Uploader is launched on a client computer, the user will be prompted to confirm that action:
Once confirmed, this security confirmation prompt will never appear a second time when launching the Windows Uploader via any Upload Action on the same client computer again in the future.
The UploadZen Window
After a few seconds, the UploadZen window appears:
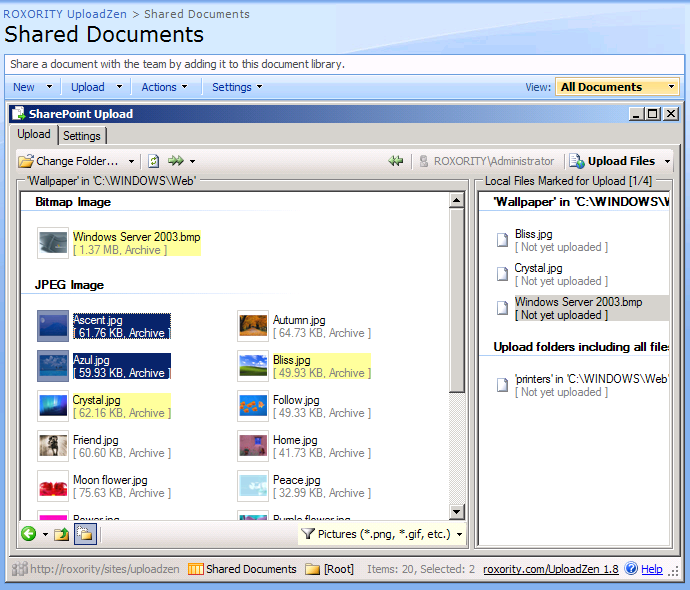
The window contains two major areas:
- the local file navigation area to the left, which lets you browse the file system and select files to be marked for uploading, as well as
- the area to the right, labelled Local Files Marked for Upload.
The Upload Files button will be enabled as soon as there are any files marked for upload (ie. placed inside the second, right-hand side area). To mark files for upload, simply select them and click the Mark selected file(s) for upload button.
After you do click the Upload Files button to initiate your upload, UploadZen will keep you informed about the progress of your upload. After all files have been processed, only files that have been uploaded successfully will be removed from the Local Files Marked for Upload area. You can mark additional files for upload even when an upload is in progress.

