
 and Server (SPS)")
 3.0 / Microsoft Office SharePoint Server (MOSS) 2007")
Saturday
Mar052011
Walkthrough: Web Uploader
 Print Article
 End user experience of launching the Web Uploader
After UploadZen has been installed, fully deployed and its UploadZen Library Integration Site Collection feature activated:
- navigate to any Form Library, Picture Library, Slide Library, Translation Management Library, Web Part Gallery, Master Page Gallery, List / Site Template Gallery or any other SharePoint Document Library
- or select any Library View Web Part (with its Toolbar Type set to Show or Full) on any of your content, wiki or Web Part pages
- and then switch to the Documents ribbon tab in the Library Tools ribbon group.
In addition to the SharePoint Upload Document menu, you should also see an Upload Multiple Files button in the ribbon section titled New:
Note that administrators can hide this ribbon command button from certain Document
Libraries or library types by customizing the default
Upload Action under Site Actions / UploadZen Studio / Upload Actions. They
can also set up multiple, individually configured Upload Actions with different
settings (such as file type / name extension filters) targeting different libraries
by type or name.
Clicking the Upload Multiple Files button in the ribbon will show the Web Uploader:
If the
Add Files link is not visible, then the uploader will most likely display
a note that "This uploader requires either the Flash 10 browser plug-in (or
newer) or the Silverlight 4 browser plug-in (or newer)".
Selecting multiple files and uploading them
Clicking the Add Files link shows a file browsing dialog allowing the selection of multiple files:
Administrators can customize Upload Actions
to offer file type filters in the file browsing dialog box, such as Images (*.jpg;
*.gif etc) or Archives (*.zip; *.rar etc.). Offering such file type
filters (based on file name extensions) at the same time restricts the types of
files that users may select for upload.
Selecting files adds them to the listing of files to be uploaded:
- Files can be de-selected by hovering the row of the file and clicking the icon in the #number column.
- Files with blocked name extensions are highlighted in red (but administrators can customize the Upload Action to automatically remove such files from the listing when they are selected).
- Existing files with the same name are highlighted in yellow, so if end users do not want to overwrite certain existing files, they are warned and can remove the file from the listing.
- ZIP archive files can be set to one of the following options:
- Upload (don't extract) — the ZIP archive file will be uploaded as is into the current Library folder
- Extract in this folder — all files and folders in the ZIP archive file will be extracted at the server side and be placed into the current Library folder
- Extract in a new sub-folder — all files and folders in the ZIP archive file will be extracted at the server side and be placed into a newly created sub-folder (inside the current Library folder), which will be named after the original ZIP archive file
- To begin uploading the selected files, end users simply click the Upload File(s) Now link:
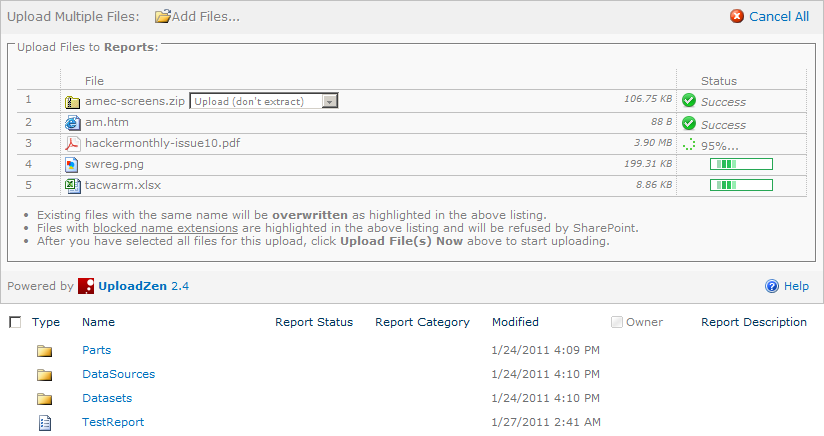
The status column now shows the exact upload progress (or result) for each file and the process can be cancelled at any time by clicking the Cancel All link.

